Irresistible Homemade Butterfingers with Peanut Butter and Chocolate
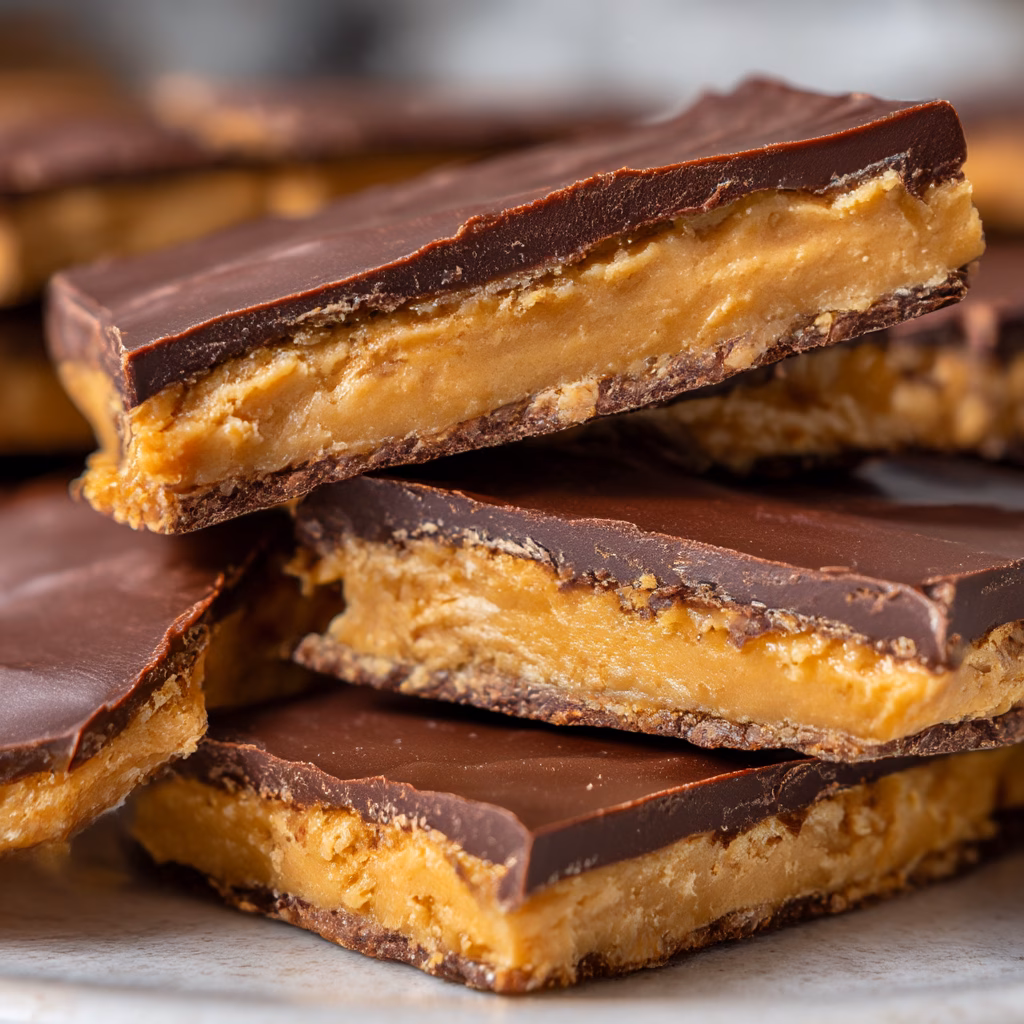
If you’re craving a crunchy, sweet, and homemade delight made with rich peanut butter and smooth chocolate, this Homemade Butterfingers with Peanut Butter and Chocolate recipe is exactly what you need. Combining the perfect balance of creamy peanut butter and melty chocolate, these treats will satisfy your sweet cravings anytime and make your kitchen smell irresistibly inviting.
Why You’ll Love This Recipe
- Simple Ingredients: Uses everyday pantry staples that come together quickly for a fuss-free treat.
- Crunchy Texture: The signature crispiness gives you that addicting Butterfinger feel in every bite.
- Rich Flavors: Combines the deep taste of peanut butter with luscious, smooth chocolate for ultimate satisfaction.
- Perfect Anytime Snack: Great for an afternoon boost, dessert, or sharing at gatherings.
- Customizable: Easy to tweak with your favorite add-ins or toppings for a personalized experience.
Ingredients You’ll Need
This recipe keeps it simple but covers all the bases for that classic Butterfinger taste. Each ingredient brings a unique role, from texture to flavor, creating a harmonious sweet treat you’ll love.
- Crunchy Peanut Butter: Provides the creamy, nutty base that is essential to the authentic taste and holds the crunch perfectly.
- Powdered Sugar (natural): Adds sweetness and structure for the right consistency of the layers.
- Light Corn Syrup (natural): Helps bind ingredients smoothly while keeping that chewy texture.
- Vanilla Extract (natural): Elevates the flavors with a gentle aromatic touch.
- Semisweet Chocolate Chips (plant-based): Coats the bars and melts into a shiny, smooth finish every time.
- Vegetarian Worcestershire Sauce (natural): Adds a subtle depth to the filling, boosting flavor complexity.
- Pinch of Salt: Balances the sweetness and enhances the overall taste.
- Natural Gelling Agent: Ensures the perfect firm yet slightly chewy texture reminiscent of classic Butterfingers.
Variations for Homemade Butterfingers with Peanut Butter and Chocolate
One of the best things about this Homemade Butterfingers with Peanut Butter and Chocolate recipe is how easily it adapts to your tastes and dietary needs. Whether you’re craving a twist or catering to specific preferences, these variations keep the essence while mixing things up.
- Nut-Free Option: Substitute sunflower seed butter for peanut butter to keep the crunch without nuts.
- Extra Crunch: Add toasted puffed rice or crushed plant-based cereal for additional texture.
- Dark Chocolate Coating: Use dark chocolate chips (plant-based) for a richer, less sweet finish.
- Sea Salt Topping: Sprinkle flaky sea salt on top before the chocolate hardens for a delicious salty-sweet vibe.
- Spiced Variation: Add a pinch of cinnamon or chili powder to the peanut butter layer for subtle warmth.

How to Make Homemade Butterfingers with Peanut Butter and Chocolate
Step 1: Prepare the Peanut Butter Filling
In a mixing bowl, combine crunchy peanut butter with powdered sugar (natural), light corn syrup (natural), vegetarian Worcestershire sauce (natural), vanilla extract (natural), a pinch of salt, and natural gelling agent. Stir until smooth yet thick enough to hold its shape.
Step 2: Shape the Bars
Press the mixture firmly into a lined baking pan, spreading it evenly to create a thick layer. Use a spatula dipped in warm water to smooth the surface and compact the mixture.
Step 3: Chill to Firm Up
Refrigerate the peanut butter layer for about 1 hour or until firm enough to cut without crumbling.
Step 4: Cut into Bars
Remove from the fridge and carefully lift the peanut butter slab from the pan. Using a sharp knife, slice into finger-sized bars for that classic Butterfinger shape.
Step 5: Coat with Chocolate
Melt the semisweet chocolate chips (plant-based) in a double boiler or microwave in short bursts. Dip each bar into the melted chocolate, ensuring full coverage, then place them on parchment-lined trays.
Step 6: Set the Chocolate
Allow the chocolate coating to fully set at room temperature or pop the trays back into the fridge for quicker firming.
Pro Tips for Making Homemade Butterfingers with Peanut Butter and Chocolate
- Use crunchy peanut butter: This is key for the authentic Butterfinger crunch; smooth peanut butter won’t give the same texture.
- Keep hands slightly warm: When shaping bars, warm hands gently shape the texture without cracking.
- Chocolate tempering tip: Add a little coconut oil (natural) to melted chocolate to make it glossy and easier to coat.
- Chill between steps: Proper refrigeration helps maintain shape and makes handling easier when dipping the bars.
- Avoid moisture: Make sure all utensils and surfaces are dry to prevent chocolate from seizing or the peanut layer from softening.
How to Serve Homemade Butterfingers with Peanut Butter and Chocolate
Garnishes
Sprinkle chopped smoked turkey bacon or smoked turkey slices finely on top of the chocolate before it sets for a surprising savory crunch that elevates the sweet treat. Alternatively, a light dusting of crushed toasted nuts or a drizzle of grape juice (natural) reduction adds that extra wow factor.
Side Dishes
Pair these bars with a refreshing glass of chilled grape juice (natural) or an herbal tea to balance the richness. A bowl of fresh berries or sliced fruits brightens the snack and complements the peanut butter and chocolate flavors beautifully.
Creative Ways to Present
Cut into bite-sized cubes and serve on a decorative platter for parties or assemble individual portions wrapped in parchment paper tied with natural twine for gifting. You can also sandwich the bars between plant-based vanilla ice cream for a decadent frozen treat.
Make Ahead and Storage
Storing Leftovers
Store Homemade Butterfingers with Peanut Butter and Chocolate in an airtight container at room temperature or in the refrigerator to keep them fresh and crunchy for up to one week.
Freezing
Wrap bars individually in parchment paper and place them in a freezer-safe bag or container. Freeze for up to three months, then thaw at room temperature to enjoy later.
Reheating
If you prefer the bars slightly soft, let them sit at room temperature for 10–15 minutes before serving. Avoid microwaving, as the chocolate coating can melt unevenly and affect texture.
FAQs
Can I use smooth peanut butter instead of crunchy?
While smooth peanut butter will work, you’ll miss the signature crunchy texture of Butterfingers; crunchy peanut butter is recommended for the best result.
Is it possible to make this recipe nut-free?
Absolutely! You can substitute with sunflower seed butter to make it safe for those with nut allergies while keeping a delicious, creamy texture.
Can I store these bars at room temperature?
Yes, they keep well at room temperature for up to a week if stored in a sealed container in a cool, dry place.
What kind of chocolate should I use?
Semisweet chocolate chips (plant-based) melt easily and provide a perfect balance of sweetness; however, dark chocolate chips (plant-based) work well if you want a richer taste.
How long does it take to make these bars?
From start to finish, including chilling time, plan for about 2 to 2.5 hours, but most of that is inactive chilling time.
Final Thoughts
Making Homemade Butterfingers with Peanut Butter and Chocolate is such a rewarding experience the blend of crunchy, sweet, and creamy with a smooth chocolate finish is like a little celebration in every bite. Whether you’re treating yourself or sharing with friends and family, this recipe will quickly become your go-to indulgence. So gather those simple ingredients and dive into crafting your own little batch of delight today!
Related Posts
- Irresistible Vanilla Coffee Cupcakes with Creamy Frosting
- Irresistible Nutella-Stuffed Snowball Cookies Recipe
- Irresistible Banana Bread with Homemade Oat Flour
Homemade Butterfingers with Peanut Butter and Chocolate
- Total Time: 2 hours 25 minutes (includes chilling time)
- Yield: 12 bars 1x
- Diet: Gluten Free
Description
Crunchy, sweet homemade Butterfinger bars made with rich crunchy peanut butter and smooth semisweet chocolate, delivering the perfect balance of creamy and crispy textures for a delightful snack or dessert.
Ingredients
Peanut Butter Filling
- 1 cup crunchy peanut butter
- 1 1/2 cups powdered sugar (natural)
- 1/4 cup light corn syrup (natural)
- 1 tsp vegetarian Worcestershire sauce (natural)
- 1 tsp vanilla extract (natural)
- Pinch of salt
- 1 tsp natural gelling agent
Chocolate Coating
- 1 1/2 cups semisweet chocolate chips (plant-based)
- 1 tsp coconut oil (natural) (optional for chocolate tempering)
Optional Garnishes
- Chopped smoked turkey bacon
- Smoked turkey slices finely chopped
- Crushed toasted nuts (plant-based)
- Light drizzle of grape juice (natural) reduction
- Flaky sea salt for topping
Variations (Optional)
- Substitute sunflower seed butter for peanut butter (nut-free option)
- Add toasted puffed rice or crushed plant-based cereal for extra crunch
- Use dark chocolate chips (plant-based) instead of semisweet for richer coating
- Add a pinch of cinnamon or chili powder to the filling for spiced variant
Instructions
- Prepare the Peanut Butter Filling: In a mixing bowl, combine crunchy peanut butter, powdered sugar (natural), light corn syrup (natural), vegetarian Worcestershire sauce (natural), vanilla extract (natural), a pinch of salt, and natural gelling agent. Stir thoroughly until you achieve a smooth mixture that is thick enough to hold its shape.
- Shape the Bars: Press the peanut butter mixture firmly into a lined baking pan, spreading evenly to create a thick layer. Use a spatula dipped in warm water to smooth and compact the surface.
- Chill to Firm Up: Place the pan in the refrigerator and chill for about 1 hour or until the mixture is firm enough to cut without crumbling.
- Cut into Bars: Remove the firm peanut butter slab from the pan and use a sharp knife to slice into finger-sized bars, mimicking the classic Butterfinger shape.
- Coat with Chocolate: Melt the semisweet chocolate chips (plant-based) in a double boiler or microwave in short bursts. Optionally, stir in coconut oil (natural) for glossy, easier coating. Dip each peanut butter bar fully into the melted chocolate and place on parchment-lined trays.
- Set the Chocolate: Allow the chocolate-coated bars to set at room temperature or refrigerate for quicker firming until the chocolate is fully hardened.
Notes
- Use crunchy peanut butter to maintain authentic texture; smooth peanut butter changes the feel.
- Keep hands slightly warm when shaping bars to avoid cracking.
- Adding a bit of coconut oil (natural) to melted chocolate helps achieve a glossy finish.
- Chill the bars properly between steps for ease of handling and shape maintenance.
- Ensure utensils and surfaces are dry to prevent chocolate from seizing or filling from softening.
- Prep Time: 20 minutes
- Cook Time: 5 minutes (for chocolate melting and coating)
- Category: Appetizers
- Method: Baking
Nutrition
- Serving Size: 1 bar
- Calories: 210
- Sugar: 18g
- Sodium: 85mg
- Fat: 14g
- Saturated Fat: 4g
- Unsaturated Fat: 10g
- Trans Fat: 0g
- Carbohydrates: 19g
- Fiber: 2g
- Protein: 5g
- Cholesterol: 0mg
Keywords: Butterfingers, peanut butter, chocolate, homemade candy, crunchy snack, plant-based, gluten free